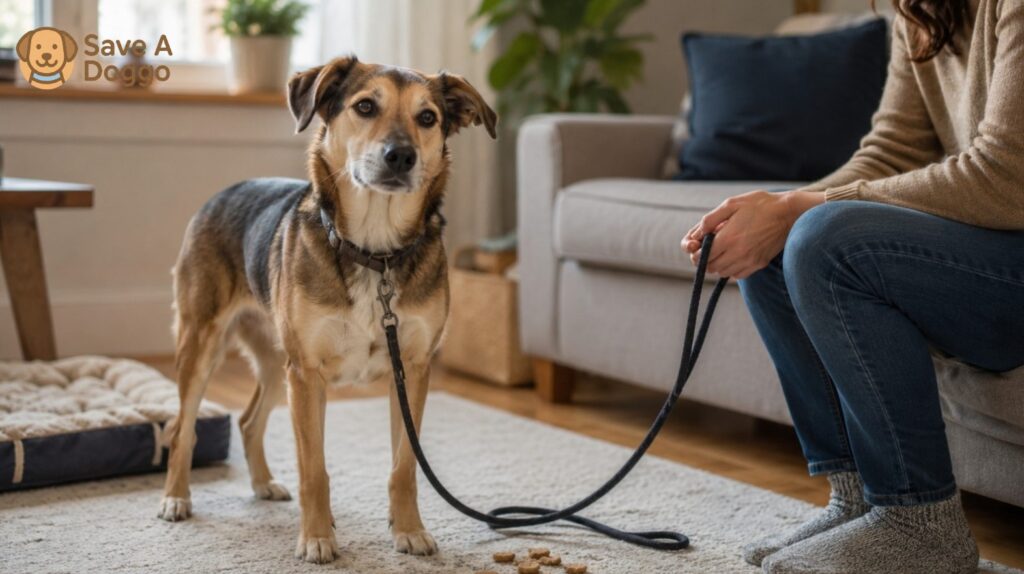
If your rescue dog is afraid of the leash or collar, stop chasing, cornering, grabbing, or forcing the equipment on. First prevent escape, then teach in tiny indoor steps that the equipment and your hands predict good things. Show the leash from a comfortable distance, reward calm observation, put it away, and finish before the dog needs to flee or defend themselves.
Do not begin with a neighborhood walk. Your first goal is not distance—it is a dog who can see the equipment, approach voluntarily, accept brief handling, wear properly fitted gear, and move comfortably while the leash remains loose. If the dog freezes, hides, stops taking food, growls, snaps, thrashes, or tries frantically to escape, stop and return to an easier step. Contact a veterinarian if pain may be involved and get qualified, reward-based behavior help when necessary care cannot be completed safely.
Quick Answer: What Should You Do First?
- Secure the environment. Close exterior doors, use gates or an entry barrier, update identification, and prevent accidental access to unfenced areas.
- Work out what predicts fear. The dog may fear the object, the clip sound, hands reaching toward the neck, pressure on the body, the doorway, or the outside environment.
- Start below the dog’s fear threshold. Present the equipment far enough away that the dog can remain loose, eat normally, and move by choice.
- Pair one tiny event with a reward. Leash appears, food arrives; leash disappears, food stops. Repeat briefly.
- Progress one detail at a time. Seeing, movement, sound, approach, touch, fastening, wearing, attaching, and walking are separate skills.
- Keep the leash loose. Do not drag the dog toward you, through a doorway, or toward something frightening.
- Get help early when safety is uncertain. A dog who may bite or escape needs an individualized plan, not more force.
Leash fear is not stubbornness. Avoidance and defensive behavior communicate that some part of the setup feels unsafe, painful, or overwhelming.
First Identify What the Dog Is Afraid Of
“Afraid of the leash” can describe several different problems. Observe the first moment the dog’s body changes.
| The first difficult moment | What may be frightening | Best starting point |
|---|---|---|
| Dog leaves when the leash becomes visible | Sight of the object or what it predicts | Show it briefly from farther away, reward, and put it away |
| Dog startles when the clip moves | Metal noise or sudden movement | Make a very soft clip sound at a distance, then reward |
| Dog accepts the leash nearby but avoids your hand | Reaching, collar grabs, restraint, or previous rough handling | Practice hand movement toward the shoulder from a safe distance |
| Dog is comfortable with a collar but avoids a harness | Head opening, straps touching the body, buckle sound, or fit | Train each harness component separately or consider a different design |
| Dog lets you fasten equipment but freezes when wearing it | Pressure, unfamiliar body sensation, poor fit, or pain | Remove it if safe, check fit, and rebuild duration from seconds |
| Dog moves indoors but freezes at the doorway | Doorway, surface change, outside sound, or previous forced exits | Train near the closed door without requiring the dog to cross it |
| Dog exits but panics outside | Traffic, people, dogs, open space, or neighborhood intensity | Use the quietest toilet area and address outdoor fear separately |
| Dog suddenly becomes sensitive after previously walking normally | Pain, injury, skin irritation, ear or dental discomfort, or illness | Arrange a veterinary examination before continuing |
| Dog grabs or attacks the leash during walks | Anxiety, frustration, conflict, play history, or overarousal | Reduce triggers, avoid tugging back, and assess the pattern with a professional |
Do not assume a difficult history must be the cause. Some rescue dogs simply have little experience with household equipment. Others may be comfortable with the leash but frightened by everything that follows it.
Read Body Language Before Every Step
The dog’s body determines whether a step is easy enough.
Signs the dog may be comfortable enough to continue
- Body and face remain loose
- Dog can look away from the equipment and reorient normally
- Approaches, sniffs, or moves by choice
- Takes food gently at a normal pace
- Can pause, shake off, sniff, or settle
- Tail, ears, and posture look typical for that individual
- Recovers quickly after a small sound or movement
Signs to make the step easier
- Leaning or turning away
- Lowered head or body
- Sudden stillness or reduced movement
- Repeated lip licking, yawning, paw lift, or scratching
- Taking treats roughly or more slowly than usual
- Refusing food that the dog normally values
- Moving behind furniture or increasing distance
- Scanning the room instead of engaging
Signs to stop the session
- Freezing with a tense body
- Fleeing, hiding, or frantic escape attempts
- Growling, snarling, air snapping, or biting
- Thrashing, rolling, or clawing at the equipment
- Persistent panting unrelated to heat or activity
- Inability to recover after the equipment is removed
Food refusal is not proof by itself, but a sudden refusal during training often means the dog is too worried, not hungry, or physically uncomfortable. Do not move the equipment closer simply because the dog will not take a treat.
Use SaveADoggo’s rescue dog body-language guide to compare fear, stress, curiosity, and relaxed behavior before increasing difficulty.
Safety Comes Before Leash Training
A newly adopted dog can slip out of ordinary equipment or bolt through a door before you know their escape behavior. No collar, harness, clip, or backup system is completely escape-proof.
Before practice:
- Confirm the microchip registration and identification details are current.
- Inspect collars, harnesses, leashes, rings, stitching, and clips for wear or damage.
- Close exterior doors and windows that the dog could push through.
- Use a closed interior door or secure gate to create a second barrier near the exit.
- Ask household members not to open the exterior door during training.
- Keep children and other animals out of the training area.
- Choose a room with a non-slip floor and enough space for the dog to move away.
- Have rewards ready before the equipment appears.
Clip the leash while still behind the interior barrier, check each connection, hold the leash securely, and only then open the route outside. Do not attempt to attach equipment in an open doorway, parking lot, unfenced yard, or beside an open vehicle.
If your dog cannot yet be equipped safely, use only a genuinely secure, fully enclosed toilet area that the dog cannot leave. If you do not have one, call the rescue organization, veterinarian, or qualified professional promptly to create a safe toileting and handling plan. Do not carry, chase, or drag a panicking dog into public space.
Choose Equipment for Comfort and Escape Prevention
The best equipment is the setup that fits the individual dog, allows natural movement, remains secure, and can be introduced without force.
Collar
A flat collar can carry identification and may suit a dog who is comfortable with neck handling. It should not be so loose that the dog can back out or so tight that it rubs, restricts swallowing, or causes discomfort. Coat thickness, head shape, neck shape, growth, and weight changes affect fit.
Do not use leash corrections, choke chains, prong collars, or electronic collars to overcome fear. These tools can add pain or alarm to an already frightening situation. The American Veterinary Society of Animal Behavior recommends reward-based methods for all dog training and behavior modification and advises against aversive tools and physical or psychological punishment.
Harness
A well-fitted harness may reduce pressure on the neck and provide an additional attachment option. Choose a design that:
- Does not restrict normal shoulder movement
- Does not rub behind the front legs
- Cannot be backed out of during ordinary movement
- Has straps and clips that can be introduced gradually
- Can be put on without forcing the dog’s head through an opening if the dog is head-shy
- Remains stable when the dog turns, reverses, or lowers their body
Some fearful or newly adopted dogs need an escape-resistant harness with an additional body strap, plus an appropriate backup connection to a properly fitted collar. Ask the rescue organization or a qualified professional to fit and test the system indoors. A backup should improve safety without tightening around the neck, tangling the dog, or restricting movement.
Dogs Trust’s harness-training guidance recommends choosing a harness that does not obstruct the shoulders, checking that the dog cannot slip out, introducing it gradually, and returning to an earlier step if the dog retreats.
Leash
Begin with a comfortable fixed-length leash that is easy for the handler to hold and appropriate for the dog’s size. Inspect the clip and webbing before every outing.
Avoid a retractable leash during early fear work. Sudden tension, a dropped handle that chases the dog, equipment failure, or extra distance near exits and roads can increase risk. Do not wrap any leash around your hand, waist, or body unless a qualified professional has assessed the setup and taught you how to use it safely.
Never leave a leash dragging on an unsupervised dog. It can catch on furniture, crates, gates, or limbs and cause panic or injury.
Prepare a Low-Pressure Training Session
Use a quiet indoor room at a time when the dog is awake but not highly aroused. A session may last only ten to sixty seconds at first.
Prepare:
- Small food rewards the dog already tolerates, or another reward the dog genuinely enjoys
- The single item you plan to introduce
- A non-slip surface
- A clear exit route so the dog can move away
- A secure exterior-door barrier
- A simple written note of the step attempted and the dog’s response
Do not train when visitors are present, another animal is competing for food, the dog urgently needs to toilet, or the household is preparing to leave. The equipment should not appear only when you are rushed.
The Gentle Leash and Collar Training Ladder
The stages below are not a one-session checklist. Spend as long as needed at each stage, and split any stage into smaller pieces when the dog’s body changes.
Stage 1: The equipment appears at a safe distance
Stand or sit sideways rather than leaning toward the dog. Briefly show the leash, collar, or harness at a distance where the dog notices but remains comfortable. Deliver a reward away from your body, then put the equipment out of sight.
Repeat only a few times. If the dog leaves, freezes, or cannot eat normally, increase distance, reduce movement, or use an easier item.
The pattern is simple:
- Equipment appears.
- Something pleasant happens.
- Equipment disappears.
- The session ends while the dog is still comfortable.
Stage 2: The equipment moves and makes sound
Movement and sound are separate triggers. Lift the item slightly, reward, and place it down. On another repetition, move a clip without fastening it. Later, make the quietest possible buckle or clip sound at a distance, reward, and stop.
Do not repeatedly snap the clip beside the dog’s ears. If the sound causes a startle, make it softer and farther away next time.
Stage 3: The dog chooses to approach
Place the equipment on the floor and give the dog room. Reward looking or moving toward it. You can place food near—but not on—the item if the dog remains comfortable.
Do not hold food so that the dog must push past fear to reach it. The dog should be able to take the reward and leave without being trapped, touched, or suddenly equipped.
Stage 4: Hands move toward the body
Practice without fastening anything. Move one hand partway toward the shoulder or chest, reward, and withdraw. Gradually reduce distance over several sessions.
When the dog remains loose, progress to a brief touch on an area they already accept. Reward after the touch and remove your hand. Neck, ear, head, leg, and belly handling may be much harder and should not be assumed safe.
Use a simple consent check: after one brief touch, pause. If the dog stays or moves closer with loose body language, you may offer another repetition. If the dog turns away, steps back, stiffens, or leaves, stop.
Stage 5: The dog interacts with the collar or harness
For a collar, practice touching the strap near the shoulder before bringing it toward the neck. For a harness, reward the dog for looking at and approaching it before asking for any body movement.
If the harness has a head opening, hold it wide and reward the dog for voluntarily moving the nose toward or briefly through it. Keep your hands still and allow the dog to withdraw. Do not pull the harness over the head while the dog reaches for food.
For a head-shy dog, a harness that clips around the neck and body may be easier, but each strap movement and clip still needs a gradual introduction.
Stage 6: Brief fastening and immediate release
When touch, strap movement, and buckle sound are comfortable separately, combine only two pieces at a time. Touch the strap to the body, reward, and remove it. Drape it for one second, reward, and remove it. Fasten one clip, reward, unfasten, and end.
Keep fingers away from skin and fur when buckling. Do not hold a struggling dog still to finish. If removal may trigger a bite, stop approaching and contact a professional for a safe plan.
Stage 7: Wearing the equipment indoors
Build from seconds to short periods while the dog performs an easy, enjoyable activity. Observe walking, turning, sitting, lying down, breathing, and scratching.
Remove the equipment if it shifts, rubs, restricts movement, or causes persistent concern. A dog who becomes motionless is not “getting used to it”; freezing can be a stress response.
Stage 8: Attach and remove the leash
Hold the leash so its weight does not pull on the dog. Clip, reward, unclip, and finish. Repeat later only if the dog remains comfortable.
Next, clip the leash and place part of it on the floor for one or two supervised seconds while maintaining control of the free end. Do not let the clip bang against the dog or allow the leash to wrap around legs.
Stage 9: Follow a loose leash indoors
Hold the leash in a gentle curve. Reward one voluntary step with you, then pause. Tossing a treat a short distance in the direction of travel can create movement without pulling, provided the dog does not guard food or become frantic.
Practice turns, stopping, and a few steps in both directions. If the leash becomes tight, stop adding pressure. Move closer, create slack, or invite the dog in an easier direction.
Stage 10: Practice near the closed door
Work far enough from the door that the dog can still respond normally. Practice clipping the leash, taking one or two steps, receiving a reward, and moving away from the door.
Later, touch the handle, reward, and walk away. Open the door a crack while a second secure barrier remains closed, reward, then close it. Crossing the threshold is a separate stage.
Stage 11: Take the first quiet outdoor steps
Choose the quietest time and shortest route to the toilet area. Check the fit and all connections inside. Keep the leash loose, avoid greetings, and return before the dog becomes overwhelmed.
The first successful outing may be one toilet break or a few minutes of sniffing—not a full walk. SaveADoggo’s guide to decompression walks for rescue dogs explains why slower, lower-pressure outings can be more useful than covering distance.
How to Know When to Move to the Next Stage
Move forward only when the dog can repeat the current step with:
- Loose posture
- Normal movement
- Voluntary participation
- Normal interest in food or other rewards
- No attempt to flee, hide, or defend themselves
- Quick recovery after the equipment disappears
One successful repetition does not require immediate progression. Practice across more than one brief session and vary only one feature at a time: distance, duration, movement, sound, touch, location, or pressure.
If the dog struggles, the training has provided information. Return to the last easy step rather than repeating the difficult one until the dog gives up.
What If the Dog Must Go Outside Before Training Is Complete?
Toileting needs make this a safety problem, not a reason to rush through fear.
- Ask the shelter or foster caregiver exactly how they previously equipped and walked the dog.
- Request hands-on help from someone the dog already knows if that can be arranged safely.
- Use a fully enclosed private toilet area only after checking every gate, gap, and fence line.
- Keep exterior doors locked while equipment is being attached.
- Use the quietest route and time of day.
- Avoid unnecessary walking; complete the toilet trip and return.
- Do not use an unfenced yard, long line, or open doorway as a training experiment.
- Contact the veterinarian or behavior professional promptly if basic care cannot be completed.
Do not leave unfamiliar equipment on continuously merely because putting it back on is difficult. Straps can rub or snag, and fit can change as the dog moves or rests. An individualized professional plan may sometimes use supervised wear, but that decision should follow a safety assessment.
The rescue dog first-week schedule can help you reduce unnecessary outings while keeping toilet breaks, meals, rest, and brief training predictable.
If the Dog Bites or Grabs the Leash
Leash biting is not always play. It may occur when a dog is anxious, frustrated, overaroused, conflicted, or trying to create distance.
If it happens:
- Stop pulling or tugging against the dog.
- Create slack if doing so does not increase escape risk.
- Move away from the trigger or end the outing calmly.
- Use a prepared treat scatter or appropriate carried toy only if it is safe for that dog.
- Record what happened immediately before the behavior.
- Inspect the leash for damage before using it again.
If the dog may bite through the leash, use a professionally fitted backup setup and carry a spare fixed-length leash. Do not switch to a chain leash or add a muzzle solely to suppress the behavior without addressing the cause. Dogs Trust notes that tugging back can intensify leash grabbing and recommends identifying triggers, planning ahead, and teaching alternative behavior.
Seek professional help if the dog redirects onto your hands, clothing, another animal, or a person; if escape is possible; or if the behavior is escalating.
When Leash or Collar Fear May Be Pain
Arrange a veterinary examination when fear appears suddenly or the dog shows:
- Pain or flinching around the neck, ears, mouth, shoulders, spine, legs, or abdomen
- Coughing, gagging, voice change, or breathing changes with neck pressure
- Limping, stiffness, reluctance to turn, or difficulty rising
- Red skin, hair loss, swelling, odor, sores, or rubbing under equipment
- Head shaking, ear discharge, dental odor, drooling, or difficulty eating
- Crying out when touched or when the equipment moves
- A marked behavior change or new aggression
- Persistent freezing even with correctly fitted lightweight equipment
Do not repeatedly handle a painful area to prove that it hurts. Call the clinic beforehand and explain that the dog is fearful of collars, leashes, or hands near the head and neck. The veterinary team may adjust the arrival, examination, or medication plan.
If this is the dog’s first health assessment after placement, prepare with the first vet visit after adoption checklist.
What Not to Do
Avoid:
- Chasing the dog while holding the equipment
- Blocking the dog’s retreat or cornering them
- Grabbing the collar to stop avoidance
- Luring the dog close and then suddenly fastening equipment
- Dragging the dog across the floor, through a doorway, or down the street
- Keeping steady leash pressure until the dog moves from exhaustion
- Repeating the scary step until the dog stops resisting
- Punishing freezing, hiding, growling, snapping, or leash biting
- Using leash pops, choke chains, prong collars, or electronic collars
- Leaving a dragging leash on an unsupervised dog
- Testing fit or escape risk outdoors
Flooding—prolonged exposure at an intensity the dog cannot escape—may make the dog shut down rather than feel safe. The AVSAB humane training position supports systematic desensitization, positive associations, environmental management, and reward-based teaching for fear and anxiety.
A Sample Seven-Session Plan
This is a readiness-based example, not a seven-day deadline. Repeat or divide any session as needed.
| Session | One small goal | Stop while the dog can… |
|---|---|---|
| 1 | See the equipment at a comfortable distance | Look, eat normally, and move freely |
| 2 | Watch one small movement or quiet clip sound | Recover immediately and remain loose |
| 3 | Approach or sniff by choice | Leave without being followed or touched |
| 4 | Accept one brief hand movement or touch | Stay, reapproach, or disengage calmly |
| 5 | Allow a strap to touch or drape for one second | Move normally after it is removed |
| 6 | Tolerate one brief fastening and release | Remain comfortable through the sound and touch |
| 7 | Wear fitted gear and take one loose-leash step indoors | Walk, turn, and stop without freezing or pulling |
The next sessions can build duration indoors, then work near the closed door, the secured threshold, and finally a quiet toilet trip. Do not combine several new steps because the calendar says it is time.
Leash-Fear Training Tracker
| Date/time | Equipment and stage | Distance/duration | Body language | Took food normally? | Chose to approach? | Recovery time | Next easier step |
|---|---|---|---|---|---|---|---|
Record the first sign of discomfort, not only whether the equipment was eventually attached. Progress means the dog feels and behaves more comfortably; it does not mean the handler can overpower less resistance.
When to Get Professional Help
Contact a veterinarian and qualified, reward-based behavior professional when:
- The dog has bitten, snapped, or made repeated defensive threats.
- You cannot attach or remove necessary equipment safely.
- The dog can escape or cannot reach a toilet area safely.
- Fear prevents veterinary care, transportation, or other essential handling.
- The dog panics, thrashes, or risks injuring the neck, mouth, legs, or spine.
- Pain or another medical condition may contribute.
- The dog remains over threshold even at a large distance from the equipment.
- Leash biting redirects toward people, clothing, or other animals.
- Progress has stopped despite shorter, easier sessions.
- Anyone in the household feels unsafe.
Do not wait for a bite before asking for help. A professional can observe the exact trigger, select equipment, plan safe exits, and coordinate with the veterinarian. SaveADoggo explains when to call a dog trainer or behaviorist and what to look for in humane support.
Frequently Asked Questions
Why does my rescue dog run away when I pick up the leash?
The leash may predict being chased, restrained, handled around a sensitive area, taken through a frightening doorway, or exposed to an overwhelming environment. Observe the first point at which the dog’s body changes, then begin training one step before that point.
Should I use a harness instead of a collar?
A well-fitted harness may reduce neck pressure and can offer a useful attachment point, but it must allow natural movement and remain secure. Some dogs fear a harness more because it passes over the head or touches more of the body. Choose and fit equipment for the individual dog, then introduce it gradually.
How long does it take a rescue dog to accept a leash or collar?
There is no reliable fixed timeline. Mild uncertainty may improve over several short sessions; fear involving pain, panic, or defensive behavior may take much longer and require professional support. Judge progress by relaxed body language and voluntary participation, not days elapsed.
Can I leave the leash attached indoors so I do not have to clip it again?
Only for a very brief exercise under direct, active supervision. A leash can catch on furniture, gates, crates, or the dog’s legs and cause panic or injury. Do not leave a dragging leash on an unattended or sleeping dog.
What if my dog freezes as soon as the harness is on?
Do not pull the dog forward. If removal is safe, calmly remove the harness and return to an earlier stage such as touching or draping it for one second. Check fit and consider pain. If removal risks a bite or the dog remains immobile, contact a veterinarian or behavior professional.
Is it okay to use treats to put the harness over the dog’s head?
Treats can create a positive association, but do not use food to trick the dog into being trapped. Hold the opening still, reward voluntary movement toward and through it, and let the dog withdraw. Stop if the dog stretches forward while keeping the body far away, freezes, or startles when the harness moves.
What if my dog will wear the equipment but refuses to leave the house?
The equipment may not be the main problem. Doorways, surfaces, traffic, people, animals, or open space may be frightening. Practice well inside the closed door, separate door training from walking, and use the quietest necessary toilet plan without dragging the dog outside.
Should I use a prong collar or leash correction to make the dog move?
No. Pain or startling may intensify fear, damage trust, and create new associations with people or the environment. Use management, gradual exposure, and reward-based teaching instead.
What should I do if my dog growls when I reach for the collar?
Stop reaching and create distance. Do not punish the growl; it is a warning that helps prevent escalation. Secure the environment without grabbing the dog, rule out pain, and obtain qualified help before attempting collar handling again.
Why does my dog bite the leash during walks?
Possible reasons include anxiety, frustration, conflict, overarousal, or a learned game. Note what happens immediately before the behavior, move away from triggers, avoid tugging back, and reward calmer alternatives. Seek help if the dog may escape or redirect onto people or animals.
Can I use a long line while my rescue dog is still afraid?
Not as the first solution. A long line can build speed, wrap around bodies, and create sudden force. Introduce ordinary fitted equipment and leash handling first. If a long line later becomes appropriate, attach it to a suitable harness and have a qualified professional teach safe handling in a secure area.
Sources and Further Reading
The Save A Doggo Editorial Team creates practical, welfare-first resources for rescue-dog adopters, foster families, and shelter supporters. We prioritize primary and authoritative sources, distinguish observation from diagnosis, correct material errors transparently, and explain when veterinary or qualified behavior support is needed. We do not claim veterinary credentials or professional review unless a named, verifiable reviewer has approved the final article.